A little while ago my grand girls came for a few days. What fun memories we created. They were quite interested in watching their aunt and uncle get on the bus.
They feed carrot scraps to the worms. It was a fine chore as long as they didn't have to touch the dirt which had the potential of touching a (gasp) worm. Many of you know the fish cleaning stories from my childhood so I'm sympathetic.
The children and I had the opportunity to attend a worm composting work shop a month ago. As recently as a few months ago I would not have guessed worm composting was going to be on my bucket list. But sometimes these things just develop. At my husband's work they needed some people to commit to the workshop. Even though we were busy getting a vacation rental ready we decided to "help out."
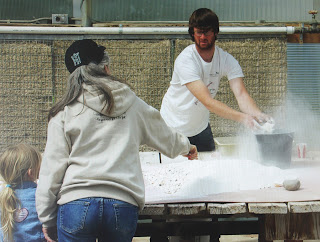
As it turned out it was so well attended we waited a week to go back and build our own worm bins as they didn't have enough for everyone. That's why the photos show me standing around with my arms folded watching everyone else stick their hands in it. Eventually I did too.
Here is the process:
Drill several holes in your bin. Fill it about 1/3 full of 7 month old decayed leaves. Here is a photo of what it looks like:
Next you add a few large handfuls of soggy, shredded newsprint. No glossy paper as it gives the worms indigestion.
Dried eggshells only please:
Grind the dried egg shells. Aaachoo! It is a dusty process.
Now add a cup of sand because the worms need it for roughage.
Add veggie scraps. Go light on fruit. No meat or dairy!
Under each of these piles of dirt is a good supply of red wiggler worms. Whatcha do is pick the worms out of the dirt one by one until you have a cup and then add them to your bin. This picking the worms took the longest of the whole process.
This is the result you are going for. The worms digest the ingedients of the bin and turn it into nutrient rich soil.
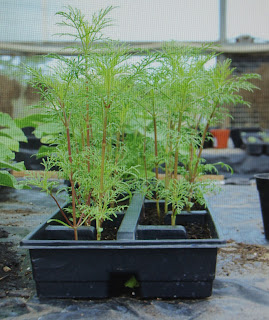
These squash and cosmos plants were started as examples and we got to take some home. They were planted just two weeks prior to this photo being taken. Hard to believe, I know. They were in a greenhouse so that also helps hasten the process, but mainly it is due to the rich soil.


Great pictures, interesting blog, cute grandkids, love the blue backgrounds...all bright and wonderful! Thanks for sharing all of this.
ReplyDeleteThank you for visiting the blog and for your cheerful comments. Today we are camping due to vacation renters in our home. Thirteen people this time. Usually I would not blog or do internet while I am camping but yesterday I got a new fancy dancy phone with fast internet. Like 20 times faster than my 3 year old phone. How quickly the electronics are vintage or just plain useless. I could barely use it as a phone any more. So I am feeling really spoiled.
DeleteWho would have thought that you would like worms. I also like the cheeriness of you background. Thanks for sharing.
ReplyDeleteThanks for your comment. I'm so happy you liked the worm blog and the 4th of July theme colors.
DeleteWow. Congratulations on the upgrade! I thought you just said 20 times faster than your three year old. Then I remembered that your three year old is a granddaughter, so had to go back and read it again. Expect this connecting to go to the next level now. Tell the girls that worms are a lot less scary if you wear garden gloves. I now am the proud owner of several pairs.
ReplyDeleteI am still a hold out on social media and texting. You are still going to have to call me with urgent messages. Emailing messages that are not time sensitive is fine.
DeletePlease photograph the new gloves. Do you know about foxgloves? They are gardening gloves fashioned after vintage evening gloves.
I like!
My views on gloves for gardening are fairly utilitarian. I prefer a left and a right, but have been known to use whatever is available. Today however, I got into the garden by mishap and too many chores, so picked that one as the most urgent. This interesting circumstance did not lend itself to worrying about gloves. I think I overdid my journey to the greenhouse, but I only have two primroses and some little shade lover left to plant. They will have to wait. I am, however, constantly mesmerized by the elegance of your every task, including evening gloves transformed as gardening gloves. Blowing a most elegant kiss from my barely clean fingertips, my dear. :) Accompanied by so much love, my princess.
ReplyDelete